Improving Software Quality
Overview
The objective of this white paper is to put forward my personal thoughts on some of the best practices in project management. They can be followed across any type of projects with any kind of software development methodologies to increase the software quality. The main aim is to identify defects during the earlier stages of the project. During the course of time you improve based on quantitative measurements that are discussed below and the end product is robust and reliable.
Market drivers
In recent times, most of us know that each IT company competes heavily with the others in the market. All the companies deliver systems that are claimed to be bug free, of high quality, reliability, scalability, etc. The truth is that there are no products that are bug free and we can only try to eliminate the bugs from the product by following worthwhile processes and methodologies. By doing this, we ensure that the product is stable enough and sanity checked. These are the key factors that determine the success of a project.
Just by adhering to the project deadlines or completing them well ahead of schedule without any proper process in place will result in rework that will cost the customers a lot more. The key to any business is the customer. It is better to build a product that has a very low percentage of bugs that can be discovered in unusual environments or impossible scenarios. This is the corner stone of quality, success and repeat business
Problem development
Whenever a person architects a project, develops a module, he or she takes great care in ensuring that his or her code is the best. If you find fault in their work, some will get offended while others might take it in their stride. The artifact also undergoes proper review by peers and is passed on to the next stage. What is the net result? We still have bugs that can be found. The reasons could primarily be human error which is unavoidable. So, how do we mitigate this problem? As a project manager, you are committed to delivering a robust product.
A generic introduction to the solution
One solution that I have been exercising in my projects is the Pareto principle which is the 80-20 principle. Pareto advocates that 20% of the causes in your project will resolve 80% of the problems. Though there are many ways to achieve this, I personally feel that implementing a Pareto Chart results in considerable improvement.
The manager must sit with his team once a month and brainstorm the issues. The brainstorming can happen from the requirement phase to the implementation phase. As you know, defects are captured in all the phases. The manager should have collated information from all types of review feedback. He can fetch them from any type of tool that he may use in the project like Rational Clear Quest, Test Manager or in an Excel sheet. The entry criterions are the cumulative review feedback, resources in the project and a conference room.
Every review feedback must be discussed in depth. For each review comment, the root cause analysis must be done by the team and they must come up with a particular cause of the problem.
An example for a root cause could be “Inadequate self review” while the review comment discussed could be “Array out of bound exception”. All of the defects – Schedule or effort variance if any & defects from review report must be discussed in a similar manner and categorized into various causes. They should be grouped by the cause.
For all the categories of the root causes identified, preventive action must be taken during the session. This is the most important step during the brainstorming session. Just identifying the root cause will not help in resolving the issue. The preventive measure arrived at and understood will serve in ensuring that these errors will be averted in future. The main entry criteria for coming up with Pareto Chart is the root cause analysis and preventive actions.
Benefits
- Identification of top priority bugs identified very early during the course of the project
- This practice mandates root cause analysis to be done coupled with preventive actions
- The team gets a chance to learn from mistakes and refrain from repeating them
- It does not involve buying any expensive software to draw the chart
- Team work is emphasized as the whole team participates in the brainstorming session thereby leading to strong cohesion
- The team tries to eliminate the top defects from recurring
- On a regular basis, the health of the project is checked by another additional means
- For shorter duration projects say 6 months, this method will prove to be very efficient
- For longer duration projects, benefits will be realized after a period of 6 months or more
- Drawing the chart is also not time consuming and the same predefined template can be used from time to time
Examples
Let me narrate how I draw the Pareto Chart using the template that I follow for my projects.
Open up an Excel sheet and enter the details below. Causal analysis must be done every month to perform the health check for your project. The frequency is not very stringent as for the projects that follow. Agile will have a shorter delivery durations and hence the causal analysis can be done every week or even lesser based on the project needs.
Make an inventory of all the defects that are reported in the review documents. After brainstorming with the team, you will need to fill in the cause of the defect and come up with a preventive action. See Figure 1 below.

Figure 1: Causal analysis template
Examples of causes of defect can be
- Inadequate Self-Review
- Improper Presentation
- Lack of training
- Inconsistent requirements
- Incomplete documentation
- User error
- Non-adherence to standards
- Inadequate Testing
The Figure 2 depicts a sample causal analysis and its preventive action mentioned.

Figure 2: Causal analysis and preventive action example
Once you are ready with this sheet, we can go ahead in identifying the top 5 defects in the project for a given month.

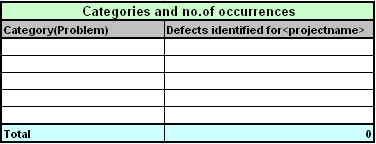
Figure 3: Categories and No. of occurrences template
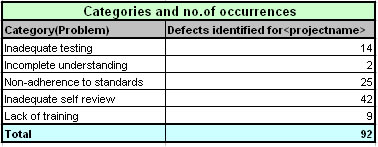
In Figure 3, you can see the categories of defects column and defects identified column. From figure 1, all the categories identified should come to the Category column in Figure 2. The no. of defects that falls under each category must be the values in the Defects column. Sample values in the figure 2 can be

Figure 4: Categories and No. of occurrences example
After ordering the categories and their number of occurrences, Figure 5 must be drawn. This will help in ranking the categories based on the frequency of occurrence. Calculate the percentage and the cumulative percentage. For example, the percentage of “Inadequate self review” is (42/92)*100 = 45.65%. Similarly we need to calculate for all the other categories.

Figure 5: Rank the no. of occurrences in descending order
Cumulative percentage will be the sum of the previous cumulative percentage and adjacent percentage. Figure 6 represents the example.

Figure 6: Rank the no. of occurrences in descending order
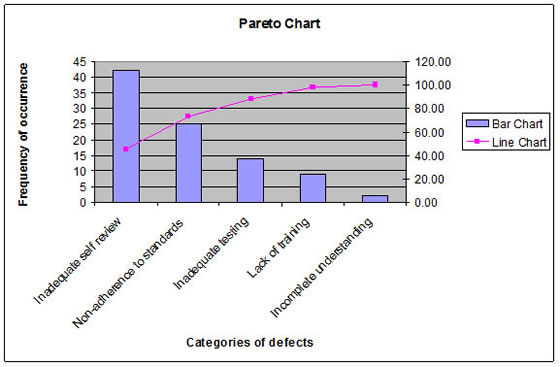
Now a Pareto chart is drawn as below. Pareto chart can be drawn by using a combination chart. To make a combination column-line chart, select a standard clustered column chart in the first step of the Chart Wizard. Press the Finish button to skip through the rest of the Wizard, to generate the bar chart.
To create a line chart showing the percentage, create another series and set the data values. If you want to combine the bar (Pareto) chart with a series graphed as a line, just graph both series as bars and then right click on the data series that you want as a line and select “Chart Type” and change it to a line.

Figure 7: Pareto Chart
You should not stop here. You have now identified the top 20% of causes that create 80% of problems in your project. In other words, you have indicated that you need to immediately address these top issues and implement the preventive action. When the next monthly review happens, these errors must be eliminated or at least their percentage must be low. This means that you have actually improved by making your team consciously follow and implement the preventive actions discussed during the brainstorm meeting. Hence eventually you will get rid of these errors in your project during the initial phases itself.
I have been applying this technique in my projects and it really has helped me in identifying defects early and also eliminating them at earlier stages of the project. I also do encounter new errors cropping up during different monthly meetings. The idea here is to ensure that we do not repeat our mistakes and this means that we are quantitatively improving. This method also is a great team building exercise.
The Author
Lakshmi Easuwaran has 8 years of experience in the IT industry and has managed projects in Utilities domain and Product Engineering for global customers like Southern California Edison, Verizon, Henry Ford Health System, Nomura and Hewlett Packard. She has worked exhaustively in technologies like Unix, C, DOTNET, EnterpriseOne (J. D. Edwards), VB, VBA, Oracle, Sybase, SQL Server in domain areas that include Finance, Healthcare, Supply Chain Management, Utilities.
She is a PMP certified professional who is very passionate in following and adhering to standard Quality Assurance processes in the projects that she manages. She has also obtained MCAD certification and possesses excellent knowledge of SDLC and CMM Level 5 process methodologies. In her current assignment, she is following the Agile software development methodology.
Lakshmi has an MBA in Marketing, a Masters’ in Computer Science and Bachelors degree in Physics in which she secured 7th rank at the University level. Her hobbies include dancing, listening to music, blogging, pets.
Copyright Project Perfect
